

Midnight Stars WIP
Midnight Stars WIP

Hiya folks! Unlike my usual WIP's which are more straightforward with clearer intention in execution, I think you'll notice that this piece took a few twists and turns along its journey. Hopefully you'll still find something of interest as you follow me through my muddled way though!

It's only a small piece ( don't ask me why I can't seem to stop myself from belabouring over a piece so small and insignificant) and though closer to something resembling what I'm looking for now, my feelings about it are quite conflicted to tell the truth. After 6 months of ruminating ( and finally 'completing' it ) I will have to move on.
I have always tried to reflect my journey in my posts as faithfully as possible, these uncertainties being an important part of it, which is why I am still posting this WIP.
Ok, now that was a needlessly long 'foreword' to a blog post, lets finally get in to it..
Starting the Painting
This piece started of straight with painting (in black diluted Pelaka) a spontaneous Chinese ink style stroke of a brush on raw unprimed cotton canvas.
A composition had been worked out already separately but I knew that this would probably evolve in time. I had no intention of adding gold leaf at this point.

With the black paint left to thoroughly dry overnight several layers of clear acrylic primer was then laid. The first few applied liberally so as to soak right through, sealing the surface right through, ready for the oil paint.

With such a dark background I opted to use a light soft pastel for the preliminary drawing.
At this point I became disillusioned with this composition and it would be several months before I resumed the piece. Though I had liked the rhythm and flow of the initial composition, it still lacked something.


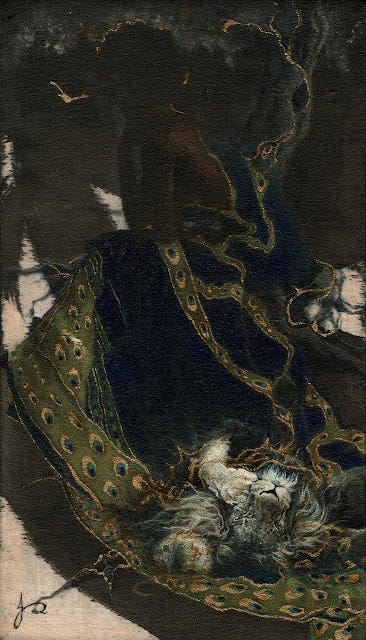
The new composition introduced more elements to the conceptual symbolism of the piece. A peacefully sleeping lion and mouse in the foreground, birds and a distant tree line and sky. I decided against a white primer at this point, as I thought it would look nicer and more harmonious. In the end I think this was the right decision (though I had doubts straight after) as now there is this deep sorta luminous darkness to the piece that is quite unique.

Beginning To Paint
For the palette I was inspired by the magnificent hues of the male peacock with their gorgeous royal blue and turquoise feathers. However I struggled to figure out a colour palette that would work harmoniously together on this black stained raw canvas with the hues I wished to include. Even muted hues could look garish on this background and choices had to be carefully.

The lion and mouse went through several stages of adjustment.
I became unhappy with how fiddly and busy it was starting to look and decided to simplify it back to how it was in the previous pic.

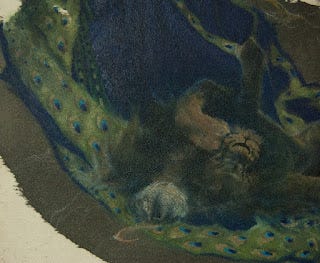

The figure was next and more work would have to be done on the background and dress, tying all the elements together in style and hue.


Goldleafing
With the the basic hues and tones down, I decided to go straight to the goldleaf before any 'fatter' layers of paint that may take a while to dry enough before I'd be able to apply the gold leaf.
I had a pretty good idea of how the completed tones and hues would look like now too and could gauge where and how much of the gold leaf I would need to apply too..
A design for the faux goldleaf was made first though, and drawn with colour pencil on to the piece (to be sure it looked alright) before applying the oil based gilding paste (my own recipe) and leaving it to dry tacky, before laying on the gold leaf..
After brushing off the goldleaf with a soft natural bristle brush, I used some duct tape to pick up goldleaf that had stuck to other areas of the painting. A very sharp pointed cutter was used to refine the goldleaf's edges. I wanted the edges to be soft though (not straight hard edges) as hard edges would stand out too much and disrupt the feel of the piece.. The aim was for the goldleaf to somewhat blend in with its surroundings but still have a presence.
This process took a few days as I waited for the gilding to be dry enough for me to brush off the excess goldleaf, tidy it up and then go through the whole process again for areas that the goldleaf didn't adhere to (because the paste had been applied too thinly) or in parts I'd decided I would like to add to the goldleaf design.
With the gilding done a little more detailing was done in oil and then the piece left to dry enough for the goldleaf to be given a very thin layer of protection of liquin+stand oil+turp (since it is just faux metal leaf it will tarnish in time if exposed to the air).

It was varnished with a satin beeswax finish after this that somewhat muted the shine of the gold.

I rather like how it looks upside down too. Here it is (colour corrected) after the Beeswax satin finish (with an undercoat of W&N Artists Gloss Varnish with UV Protection)
SOLD

I can not imagine anyone being interested enough to read through this rambling post, but thank you if you did!.. :)
Ta for now.. :)
p.s. Read more about the ideas and concept behind this piece on my website at 'Midnight Stars'.